
Create and manage settings templates
A settings template is a collection of custom settings for services like messaging, meeting, and calling. You can create and use settings templates to apply collections of settings to groups of users in Control Hub.
Overview of settings templates
Types of settings templates
- General templates that use settings that apply across services
- Meeting templates
- Messaging templates
- Calling templates
User groups
A settings template can apply to multiple groups. When a settings template is applied to a group, all users of the group inherit the value that is specified in the settings template. A group can have only one settings template of any given type.
User override
You can override the specific settings at the user level. That particular setting follows the setting value at the user level, whereas the rest of the settings in that service continue to follow the template. In general, the following is the hierarchy around setting assignments:
- Organization setting
- Group level setting via templates
- User overrides
Any changes that are made to the user’s settings at the organization level, using settings templates, or using user overrides, can take up to 8 hours to apply on the user.
Template ranking
You can add a user to multiple groups. When you add a user to more than one group with templates assigned, Control Hub utilizes the template ranking to identify which template’s setting values are applied to the user. The lower number rank, the higher the value. For example, rank 1 is higher than rank 2, and so on. In case of a conflict, we recommend that you place the most restrictive template at higher rank.
Template ranking is evaluated for each settings template type: meeting, messaging, and calling.
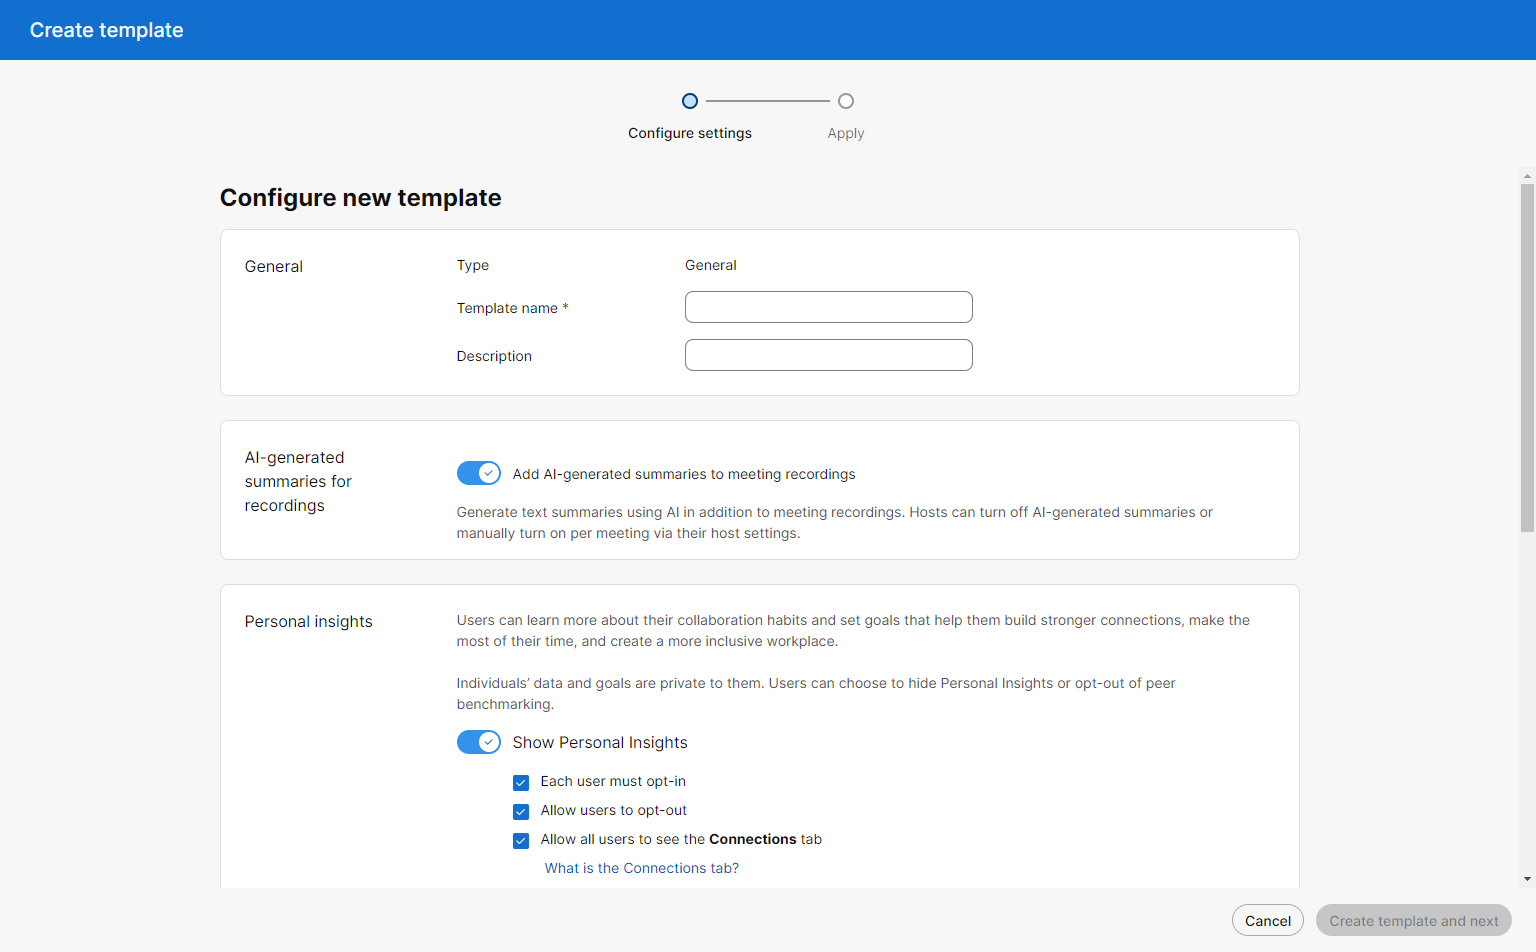
Create a general template
- From Control Hub, go to Management and select Organization Settings in the left navigation.
- Click the Templates tab.
- Click Create template and then Use a predefined template or Create a template.
- In the General section, enter the template name and description.
- Choose whether you’d like to Add AI-generated summaries to recordings by enabling or disabling the toggle.
- In the Personal insights section, you can enable or disable the Personal Insights feature and specific settings regarding that feature.
- In the Virtual background section, you can enable the virtual background toggle for internal and external meetings. All the required virtual backgrounds are set to Webex's executive office and users can't change this background.
- Click Create template and next.
- Search and select a group for this template in the search box.
- Click Done.
- To reorder the rank of your template, click Rank in the Templates tab and drag and drop to reorder and click Save, when finished.
- To delete your template, click on the template and select Delete from the Actions drop-down list. In the Delete template page, check the checkbox informing you that deleting a template is permanent, and then click Delete.
- To modify the template, click on it and modify the toggles. Click Save.
Understand meeting templates
Use meeting settings templates to assign meeting settings to a group of users. Meeting templates are a fast and easy alternative to using session types or CSV files for bulk user management. If you apply a meeting template to a group, each user in the group inherits the template values. Meeting settings templates have the following special properties, apart from the common behaviors of the settings template:
- Meeting templates apply to users of both Control Hub-managed and Site admin-managed sites. Settings templates require user accounts to be linked to Control Hub and Webex Identity.
- Settings that are part of the settings template apply to all sites in the organization.
- Settings template values apply to both host and attendees of the sites.
- You can use settings templates to apply settings to external meetings (meetings hosted on sites outside of your organization).
Site and session type restrictions are still honored, although a settings template is applied to a group. In case the site has a certain feature set to FALSE, users can't use that feature even if they had a settings template with the feature set to TRUE.
For example, a user is part of Group A with in-meeting chat ENABLED. If the user is in sites A and B and site A has in-meeting chat ENABLED while site B has in-meeting chat DISABLED, when the user hosts the meeting on site A, the user will have the chat option. When the user hosts a meeting on site B, the user won’t have the chat option.
The following is the hierarchy to process meeting settings:
- Group based meeting template
- User override or site restrictions
If you apply a session type, settings that are common between the settings template and the session type observe the previously described hierarchy. The most restrictive of the options take precedence. However, the session type determines the value for settings that exist only in the session type. Similarly, any setting that only exists in the settings template acquires its value from the settings template (with any overrides on the user level, if applied).
The following is the hierarchy of settings application, including session type restrictions to facilitate the migration of customers out of session types:
- Group based meeting template
- User override or site restrictions or session type restrictions
Site restriction, session type restrictions, and user override are at the same level, and the most restrictive rule is applied. If any of the restrictions are false, the client is restricted from joining a meeting.
Internal meeting policy and restrictions
Internal meeting policy allows the admin to decide whether users of their organization can have external users in meetings conducted on their site. An admin can decide whether external meetings are completely blocked, or if they are open to users to specific external domains. In addition, the meeting settings described in the following sections apply when the users of the organization host or attend meetings on their internal sites.
External meeting policy
Collaboration restrictions, or external meeting policies allow you to decide whether users of your organization can attend meetings in sites external to their organization. In addition, you can also specify what features the users can use using the external settings listed in the template. To learn more, see Collaboration restrictions for Webex Meetings in Control Hub.
Create a meeting template
- From Control Hub, go to Settings and click Meetings in the left navigation.
- Click the Templates tab.
- Click Create template and then Use a predefined template or Create a template.
- In the General section, enter the template name and description in the boxes provided.
- In the Internal section of Meetings, select one of the following settings:
- Allow external users to join meetings in my organization only from the approved email - Select this option if you want your external users to join your organization only through approved emails.
- Block external users to join meetings in my organization - Select this option if you want to block your external users from joining meetings in your organization.
- Allow external users to join meetings in my organization sites - Select this option if you want your external users to join meetings in your organization sites.
- In the External section of Meetings, select one of the following settings:
- Allow external meetings on all sites - Select this option if you want to allow external meetings on all your sites.
- Allow external meetings only on approved sites - Select this option if you want to allow external meetings only on approved sites.
- Block external meetings - Select this option if you want to block all external meetings in your organization's sites.
- In the Breakout sessions section, you can enable or disable Broadcast messages for internal meetings and/or external meetings.
- In the Collaboration tools section, enable or disable the following settings for internal and external meetings:
- Annotation - If you are a restricted user and annotation is disabled, others can't annotate your sharing. Annotation is blocked for you. When others are sharing, you can view what's being shared, but you can't annotate. If the restricted user is the meeting host, then nobody in the meeting can annotate.
- Polling - If disabled, the restricted user cannot use the polling feature.
- Q&A - If disabled, the restricted user cannot use the Q&A feature.
- In the In meeting section, enable or disable the following settings for internal and external meetings:
- Chat - If disabled, the restricted user cannot send or receive chat messages. If the restricted user is the meeting host, then nobody in the meeting can chat.
- Closed captioning - If disabled, the restricted user cannot use the Closed captioning feature.
- File transfer - If disabled, the restricted user cannot share files, and cannot view or download shared files.
- Participant list - If disabled, the restricted user cannot view the participant list. If the restricted user is the meeting host, then nobody in the meeting can view the participant list.
- Presenter - If disabled, users cannot take the presenter role. Note: If disabled, the restricted user cannot use the Notes feature.
- Webex Assistant - If disabled, Webex Assistant is not available in the meeting. Note: This only applies to the host.
- In the Recording section, enable or disable the following settings for hosts only for internal and external meetings:
- Cloud recording - If disabled, the host cannot record a meeting to the cloud.
- Local recording - If disabled, the host cannot record a meeting to their local computer.
- In the Remote Control section, enable or disable the following settings for internal and external meetings. If Turn on remote control is toggled off, all types of sharing are disabled. If Turn on remote control is toggled on, check or uncheck the box next to each type of remote control:
- Application remote control - If unchecked, the restricted user cannot remotely control another user's application.
- Desktop remote control - If unchecked, the restricted user cannot remotely control another user's desktop.
- Web browser remote control - If unchecked, the restricted user cannot remotely control another user's web browser.
- In the Sharing section, enable or disable the following settings for internal and external meetings. If Sharing is toggled off, all types of sharing are disabled. If Sharing is toggled on, check or uncheck the box next to each type of sharing:
- Application sharing - If unchecked, the restricted user cannot share an application.
- Desktop sharing - If unchecked, the restricted user cannot share their desktop.
- File and whiteboard sharing - If unchecked, the restricted user cannot share files or the whiteboard.
- Web browser sharing - If unchecked, the restricted user cannot share their web browser, but they can view others' shared web browsers.
- Camera sharing - If unchecked, the restricted user cannot share video from their camera.
- In the Telephony section, you can enable or disable the following settings for internal meetings only. With the exception of VoIP, these settings are not applicable to external meetings.
- Call in (applies only to the host)
- Toll - If selected, only allow incoming toll calls.
- Toll and toll free - If selected, allow incoming calls to be either toll or toll-free.
- Global call in - If checked, allows a local phone number to call in to Webex meetings. The local numbers that are available depend on how your Webex site is configured.
- Calling Line Identification (CLI) - If checked, provides additional security for your meetings. CLI is a form of caller ID that sends a caller's phone number to the system before the call is answered. For more information, see Enable CLI Authentication for Webex Meetings, Webinars, and Training. Check Use authentication PIN if you want to require a PIN when using CLI.
- Call back - If toggled on, these options apply only to the host. If toggled off, they are disabled for everyone. If Call back is toggled on, you can check the box next to Global call back. If this option is checked, all attendees will be prompted to enter their phone numbers after they join the meeting, and Webex calls back each attendee to connect them to the meeting.
- VoIP - If toggled off, VOIP (computer audio) access is blocked.
- Other teleconference service (host only) - If toggled off, the host cannot use a third-party teleconference service.
- Call in (applies only to the host)
- In the Video section, you can enable or disable the following settings for internal or external meetings. If Enable video is toggled on, you can check the boxes next to the types of video you want to be available to meeting attendees:
- Standard definition - 360p video.
- High definition - 720p video.
- Click Create template and next.
- Search and select a group for this template in the search box.
- Click Done.
- To reorder the rank of your meeting template, click Rank in the Templates tab and drag and drop in the order you’d like and then click Save, when finished.
- To delete your template, click on the template and select Delete from the Actions drop-down list. In the Delete template page, check the checkbox informing you that deleting a template is permanent, and then click Delete.
- To modify the template, click on it and modify the toggles. Click Save.

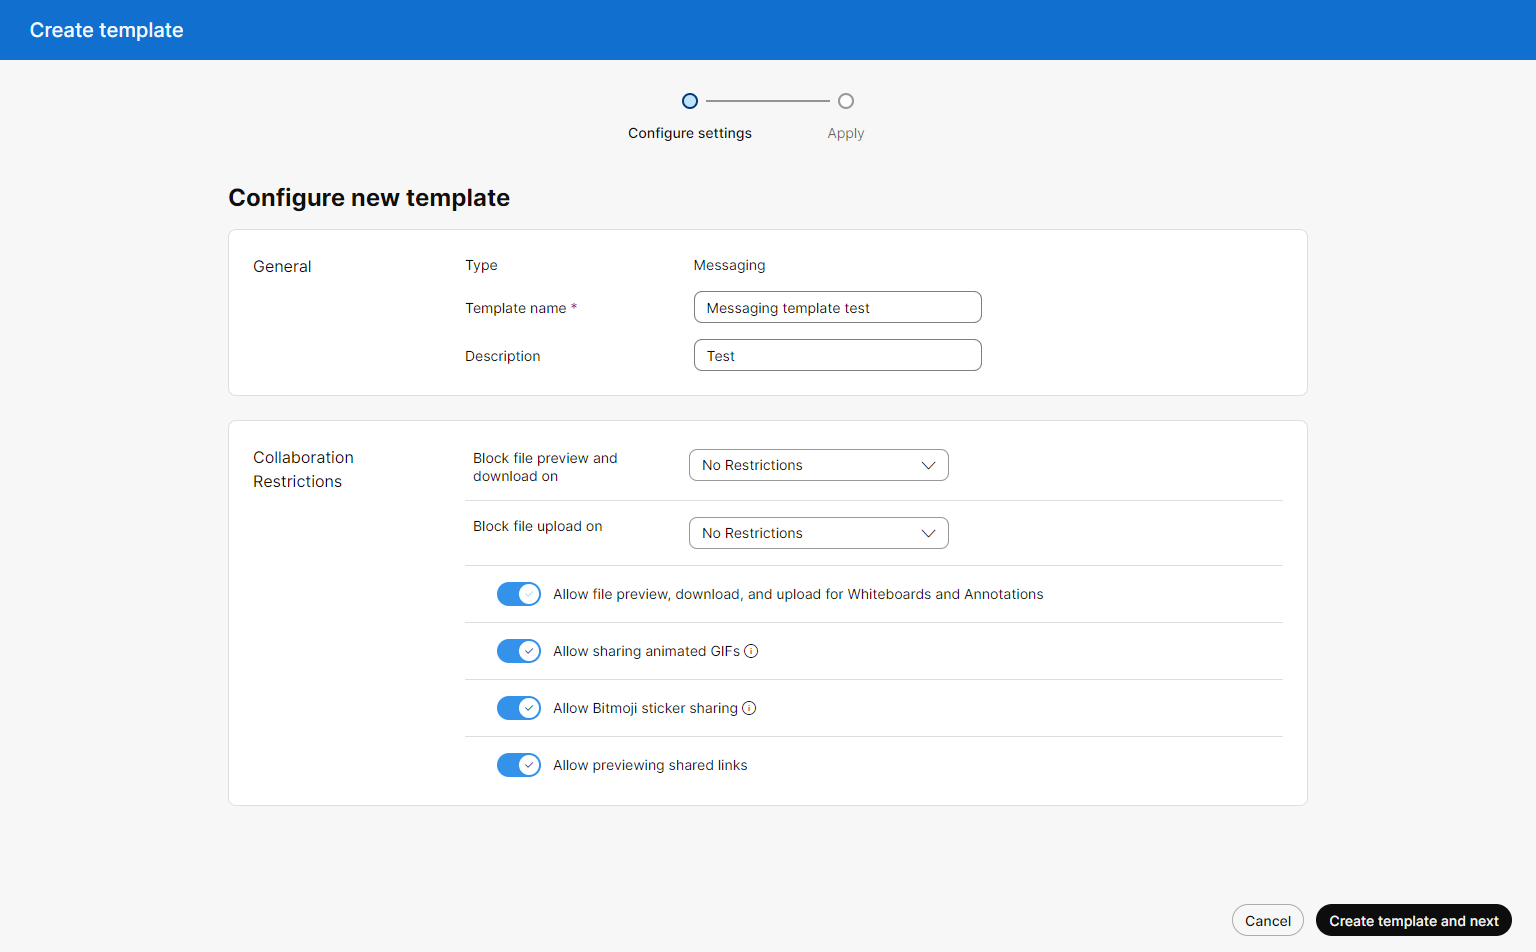
Create a messaging template
- From Control Hub, go to Services and click Messaging in the left navigation.
- Click the Templates tab.
- Click Create template and then Use a predefined template or Create a template.
- In the General section, enter the template name and description in the boxes provided.
- In the Collaboration Restrictions section, use the toggles to restrict the following settings:
- Block file preview and download on - Select the options from the drop-down:
- Webex web client
- iOS and Android app
- Mac and Windows app
- Bots
- Block file upload on - Select the options from the drop-down:
- Webex web client
- iOS and Android app
- Mac and Windows app
- Bots
- Allow file preview, download, and upload for Whiteboards and Annotations to preview, download, and upload files for Whiteboards and Annotations.
- Allow sharing animated GIFs to allow users to share animated GIFs using the GIPHY library.
- Allow Bitmoji sticker sharing to allow users to share Bitmoji stickers while messaging each other in the app.
- Allow previewing shared links to allow users to preview shared links.
- Block file preview and download on - Select the options from the drop-down:
- Click Create template and next.
- Search and select a group for this template in the search box.
- Click Done.
- To reorder the rank of your messaging template, click on Rank in the Templates tab, drag and drop in the order you’d like, and click Save, when finished.
- To delete your template, click on the template and select Delete from the Actions drop-down list. In the Delete template page, check the checkbox informing you that deleting a template is permanent, and then click Delete.
- To modify the template, click on it and modify the toggles. Click Save.
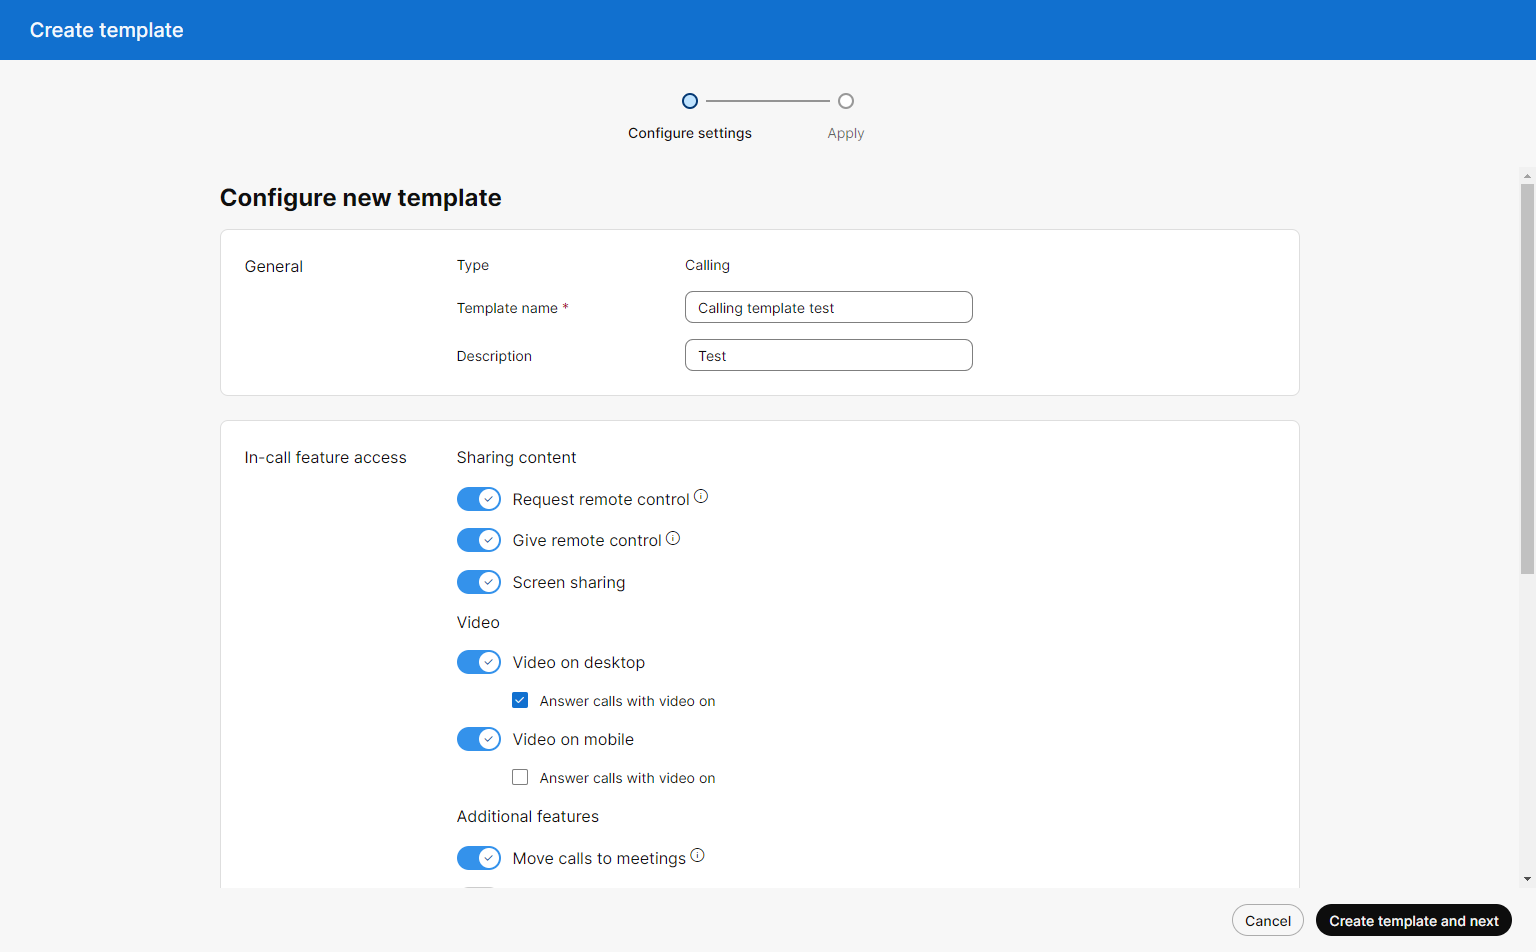
Create a calling template
- From Control Hub, go to Services and click Calling in the left navigation.
- Click Client Settings and then click Templates.
- Click Create template and then Use a predefined template or Create a template.
- In the General section, type the template name and description in the boxes provided.
- In the In-call experience section, use the toggles to restrict the following settings:
- Request remote control - Allows users to request and gain control of others' shared content.
- Give remote control - Allows users to let others take control of their shared content.
- Video on desktop - Allows users to use video on their desktops. Check the Answer calls with video on checkbox if you want to allow the users to answer calls with their videos on.
- Video on mobile - Allows users to use video on their mobile devices. Check the Answer calls with video on checkbox if you want to allow the users to answer calls with their videos on.
- Click Create template and next.
- Search and select a group for this template in the search box.
- Click Done.
- To reorder the rank of your messaging template, click on Rank in the Templates tab, drag and drop in the order you’d like, and click Save, when finished.
- To delete your template, click on the template and select Delete from the Actions drop-down list. In the Delete template page, check the checkbox informing you that deleting a template is permanent, and then click Delete.
- To modify the template, click on it and modify the toggles. Click Save.
FAQs and known issues
Still have questions? See these additional help articles:
