
Webex Calling Customer Assist
Webex Calling Customer Assist offers core capabilities of the Webex Contact Center, including Webex Calling professional features, Customer Assist call queue features, and additional tools through the Webex App for both agents and supervisors. Key features such as screen pop, supervisor tools in the Webex App, and real-time and historical views of agents and queues set it apart from Customer Assist call queue.
This solution is ideal for customers needing essential contact center features without advanced options. For more complex needs, such as advanced customer engagement, omni-channel routing, or handling large volumes of calls, we recommend Webex Contact Center.
Assign a Customer Assist license to a user
You can assign the Customer Assist license at the organization, group, or user level.
A user can’t have both the Webex Calling standard license and the Customer Assist license simultaneously.
- From Control Hub, go to one of the following paths:
- Organization level: Management > Users > Licenses > License assignment > Edit.
- Group level: Management > Groups > Webex groups or Synchronized groups > select a group > Assignments > License > Edit.
- User level: Management > Users > select a user > Summary > License > Edit License.
- Choose Customer Experience and select Essentials.
- Click Save.
Upgrade a Customer Assist call queue call queue to Essentials
With the Customer Assist license, you can upgrade an existing basic call queue to a Customer Assist queue. This upgrade retains the assigned agents, supervisors, and all existing queue settings.
Once a call queue is upgraded, it can’t be downgraded.
- From Control Hub, go to Services and select Calling from the left navigation.
- Select Features.
- Under Call Queue, select Manage.
- Find the call queue you’d like to upgrade and select the More options icon.
- Select Upgrade queue.
- Review the queue information and click Next.
The weighted routing pattern from Customer Assist call queue isn’t supported in Customer Assist and defaults to Top Down. You can change to other routing types after the upgrade.
- Choose a subscription for Customer Assist license to allocate to the agents and click Next.
This section doesn’t appear if all the agents are already assigned with the Customer Assist license.
- Review the virtual line and workspace details and check Continue upgrade without virtual line and workspace, and click Next.
This section doesn’t appear if you’ve no virtual line or workspace assigned to the call queue.
- Click Upgrade.
You can review the upgrade process in the task manager. Once the upgrade is successful, go to Services > Customer Experience > Queues to view the upgraded queue.

Create a call queue
You can create multiple call queues for your organization, so that when customers' calls can't be answered, they're provided with an automated answer, comfort messages, and/or hold music until someone can answer their call.
Only users assigned the Customer Assist license can be assigned as an agent or supervisor for Customer Assist queues.
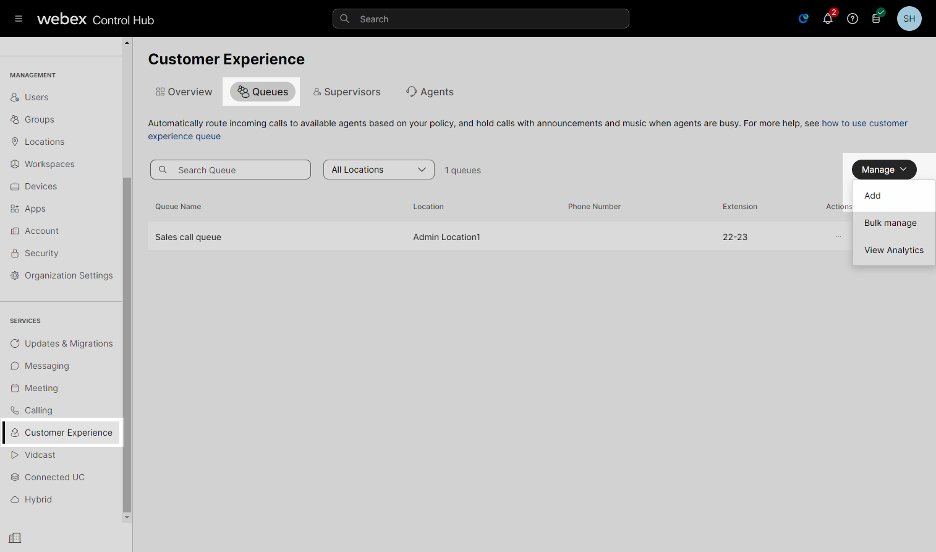
- From Control Hub, go to Services and select Customer Experience from the left navigation.
- Select Queues.
- Select Manage and then Add.
- On the Basics page, enter the following information, and then click Next.
- Location - Select a location from the drop-down menu. Note: A location is a container with location-specific calling configuration.
- Queue Name - Enter a name for the call queue.
- Phone Number - Assign a primary phone number and/or an extension to the call queue.
- Allow agents to use call queue number as caller ID - Enable the toggle to allow the queue phone number for outgoing calls.
- Number of Calls in Queue - Assign the maximum number of calls for this call queue. Once this number is reached, the overflow settings are triggered.
- Caller ID - Assign the caller ID for the call queue. The caller ID assigned here, along with the calling party caller ID name and number, will show when the call queue agents are receiving an incoming call from the queue. The caller ID is also used for calls that are forwarded outside of this call queue.
- Direct line - The primary phone number and extension from this queue. Note: Direct line option does not appear if you do not specify a phone number.
- Location number - The number assigned to the location.
- Other number from organization - Select a number from the location.
- Enter the caller ID First and Last name.
- Language - Select the call queue language from the drop-down menu.
- On the Call Routing page, choose one of the following options, and click Next.
- Priority based options:
- Circular - Cycles through all agents after the last agent that took a call. It sends calls to the next available call queue agent.
- Top Down - Sends calls through the queue of agents in order, starting from the top each time.
- Longest Idle - Sends calls to the agent that has been idle the longest. If they don't answer, proceeds to the next agent who has been idle second longest, and so on until the call is answered.
- Weighted - Sends calls to agents based on percentages you assign to each agent in the call queue profile (up to 100%).
- Simultaneous - Sends calls to all agents in a call queue at once.
- Skill based options:
Note: When you select skill based call routing, by default, routing will happen only based on the skill level. If there are more than one agents, with same skill level, then the selected routing pattern (circular/top down/longest) is followed to resolve the contention to choose the next agent for call routing.- Circular - Cycles through all agents after the last agent that took a call. It sends calls to the next available call queue agent.
- Top Down - Sends calls through the queue of agents in order, starting from the top each time.
- Longest Idle - Sends calls to the agent that has been idle the longest. If they don't answer, proceeds to the next agent who has been idle second longest, and so on until the call is answered.
- Priority based options:
- On the Queue Settings page, configure screen pop, determine how overflow calls are handled, and notifications for agents.
- Screen pop - Enable this toggle to display the customer information screen on an agent’s desktop when the agent answers an incoming call.
- Screen pop URL - Enter the URL of the intended website. After the agent answers the call, the entered URL appears in the agent desktop.
- Screen pop desktop label - Enter the label, which appears on the desktop with the hyperlink to the screen pop URL.
- Query parameters - You can enter a variable name and the associated value in the Key-Value fields to pass the data as parameters. The Key-Value pairs are used to construct the query parameter. You can use syntax {{variable}} to specify a value that dynamically fetches and displays the caller details. Click Add new to add a new parameter.
- Overflow settings - Choose one of the following options from the drop-down menu:
- Perform busy treatment - The caller hears a fast-busy tone.
- Transfer to phone number - Enter the number where you want to transfer overflow calls.
- Play ringing until caller hangs up - The caller hears ringing until they disconnect.
- You can also enable the following overflow settings:
- Enable overflow after calls wait x seconds - With this option you can enter a wait time (in seconds) for callers. Once this wait time is reached by the caller, the overflow treatment is triggered
- Play announcement before overflow processing - If this option is disabled, callers will hear hold music until the call is answered by a user.
- Notification tone for agents - Configure whether to play a notification tone to agents when a supervisor uses functions such as monitoring, barge-in, and coaching. This setting can be configured at organization level and queue level
- Screen pop - Enable this toggle to display the customer information screen on an agent’s desktop when the agent answers an incoming call.
- Click Next.
- On the Announcements page, you can determine the messages and music that callers hear while waiting in the queue. You can enable any of the following options:
- Welcome Message - Play a message when callers first reach the queue. For example, “Thank you for calling. An agent will be with you shortly.” It can be set as mandatory. If the mandatory option is not selected and a caller reaches the call queue while there is an available agent, the caller will not hear this announcement and is transferred to an agent.
- Estimated wait message for Queued Calls - Notify the caller with either their estimated wait time or position in the queue. If this option is enabled, it plays after the welcome message and before the comfort message.
- Comfort Message - Play a message after the welcome message and before hold music. This is typically a custom announcement that plays information, such as current promotions or information about products and services.
- Comfort Message Bypass - Play a shorter comfort message instead of the usual Comfort or Music On Hold announcement to all the calls that should be answered quickly. This feature prevents a caller from hearing a short portion of the standard comfort message that abruptly ends when they are connected to an agent.
- Hold Music - Play music after the comfort message in a repetitive loop.
- Call Whisper - Play a message to the agent immediately before the incoming call is connected. The message typically announces the identity of the call queue from which the call is coming from.
- Click Next.
- On the Select Agents page, use the search tool to add users or workspaces to the call queue.
- Assign a skill level (1 being the highest skill level and 20 being the lowest skill level) to each user or workspaces added to the call queue.
Note: You can only assign a skill level only when you’ve selected a skill based routing. By default, agents with skill level 1 (highest skill level) are added. - Allow agents on active calls to take additional calls - Check this box to enable this feature for the agents assigned to this queue.
- Allow agents to join or unjoin the queue - Check this box to enable this feature for the agents assigned to this queue.
- Assign a skill level (1 being the highest skill level and 20 being the lowest skill level) to each user or workspaces added to the call queue.
- Click Next.
Depending on which call routing option you chose previously, you may need to add extra information such as adding percentage weighting to users or workspaces, or in the case of circular or top-down call routing, drag and drop users and workspaces in the order of their queue position.
- On the Assign license page, choose the subscription for Customer Assist license to assign to the users and click Next.
This page doesn't appear if all the added users are already assigned with the Customer Assist license.
- On the Review page, review your call queue settings to make sure you've entered the correct details.
- Click Create and Done to confirm your call queue settings.
Disable a call queue
You can disable a previously created call queue.
- From Control Hub, go to Services and select Customer Experience from the left navigation.
- Select Queues.
- Select the call queue to disable from the list.
- In the side panel, toggle Enable Queue to off to disable the call queue.
- Click Save.
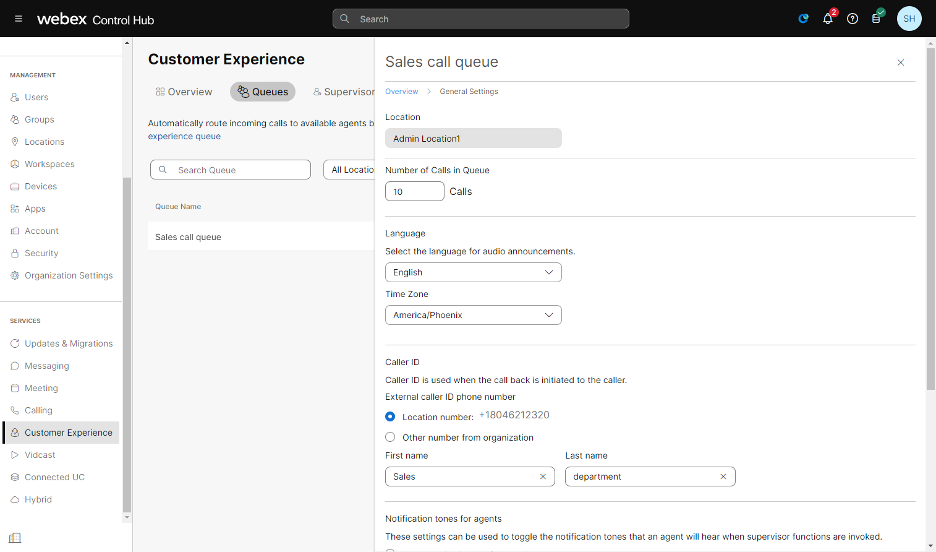
Edit call queue general settings
You can change the language, number of calls for the queue, the caller ID, and distinctive ringing features for your call queue.
- From Control Hub, go to Services and select Customer Experience from the left navigation.
- Select Queues.
- Select the call queue you’d like to edit.
- In the side panel, click Settings.
- Edit any of the following fields:
- Number of Calls in Queue - This is the maximum number of calls for this call queue. Once this number is reached, the overflow settings are triggered.
- Language - This language applies to the audio announcements for this call queue.
- Time Zone - This time zone applies to the schedules applied to this call queue.
- Caller ID - The caller ID is used when call forward is enabled and calls are forwarded out.
- Notification tone for agents - Configure whether to play a notification tone to agents when a supervisor uses functions such as monitoring, barge-in, and coaching. This setting can be configured at organization level and queue level.
- Distinctive Ringing - Set a special ring pattern to distinguish incoming calls from this call queue.
- Click Save.
Edit call queue phone numbers
You can change your call queue phone number and add up to 10 alternate numbers.
- From Control Hub, go to Services and select Customer Experience from the left navigation.
- Select Queues.
- Select the call queue to edit from the list.
- In the side panel, click Phone Number.
- Edit the Phone Number and/or Extension.
- Add Alternate Numbers using the search function.
- Enable or disable Distinctive Ringing for the alternate numbers assigned to the call queue by clicking the toggle.
- In the table, select the ring pattern to assign to each alternate number using the drop-down menu in the Ring Pattern column.
- Click Save.

Configure call forwarding for a call queue
You can forward all incoming calls dependent on a set of criteria that you define.
- From Control Hub, go to Services and select Customer Experience from the left navigation.
- Select Queues.
- Select the call queue to edit from the list.
- In the side panel, click Call Forwarding.
- Select the toggle to enable.
- Choose from one of the following options:
- Always Forward Calls - Always forward calls to a designated number.
- Selectively Forward Calls - Forward calls to a designated number depending on criteria.
If you choose Selectively Forward Calls, you'll need to have at least one rule for forwarding applied for call forwarding to be active.
- If you choose Always Forward Calls, assign the number you want to forward calls to and click Save.
When choosing Always Forward or Selectively Forward, check the Send to Voicemail checkbox to forward all calls to an internal voicemail. The Send to Voicemail checkbox is disabled when an external number is entered.
- If you choose Selectively Forward Calls, create a rule by clicking Add When to Forward or Add When Not to Forward.
- Enter a Rule Name.
- For When to Forward or When Not to Forward, select a Business Schedule and Holiday Schedule from the drop-down menu.
- For Forward To, select at least one option from Default Phone Number or add a Different Phone Number.
- For Calls From, select Any Number or Selected Numbers with at least one option from the following:
- Any Number - Forwards all calls in the specified rule.
- Any Private Numbers - Forwards calls from private numbers.
- Any Unavailable Numbers - Forwards calls from unavailable numbers.
- Add Specific Numbers - Forwards calls from up to 12 numbers that you define.
- For Calls To, select a number or alternative number from the drop-down menu, so that calls are forwarded when a call is received to this number in your organization that you define.
- Click Save.
Once a rule is created, you can enable or disable a rule using the toggle beside the rule in the table. You can also change or delete a rule at any time by clicking Edit or Delete.

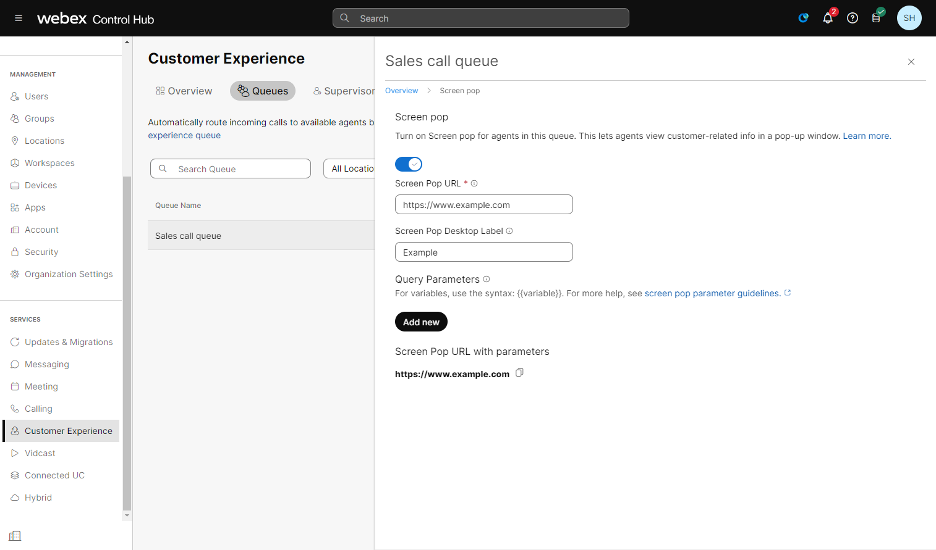
Edit screen pop settings
You can configure screen pop settings to display customer information on the agent's desktop when they answer an incoming call.
- From Control Hub, go to Services and select Customer Experience from the left navigation.
- Select Queues.
- Select the call queue to edit from the list.
- In the side panel, select Screen pop.
- Toggle the Screen pop option on and edit the following details to display the customer information screen on an agent’s desktop.
- Enter the Screen Pop URL of the intended website. After the agent answers the call, the entered URL appears in the agent desktop.
- Enter the Screen pop desktop label, which appears on the desktop with the hyperlink to the screen pop URL. For example, if the screen pop URL is https://www.example.com and the screen pop desktop label is ‘Example,’ the system displays the hyperlink as Example in the screen pop notification.
- (Optional) You can enter a variable name and the associated value in the Key-Value fields to pass the data as parameters. The Key-Value pairs are used to construct the query parameter. You can use syntax {{variable}} to specify a value that dynamically fetches and displays the caller details. For example: {{NewPhoneContact.ANI}}.
- Click Add new to add a new parameter. The following table shows the variables that are allowed to use:
{{ceee="/compontents"}} - Click Save.
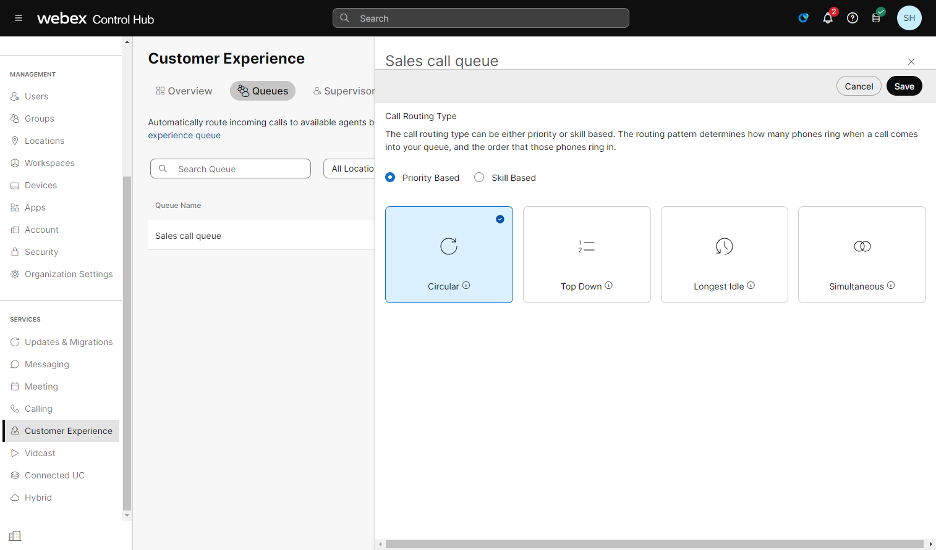
Edit call queue routing pattern
You can change the call routing pattern of your existing call queue.
- From Control Hub, go to Services and select Customer Experience from the left navigation.
- Select Queues.
- Select the call queue to edit from the list.
- In the side panel, select Call Routing Type.
- Modify the call routing type to Priority Based or Skill Based.
- Edit the following options:
- Circular - Cycles through all agents after the last agent that took a call. It sends calls to the next available call queue agent.
- Top Down - Sends calls through the queue of agents in order, starting from the top each time.
- Longest Idle - Sends calls to the agent that has been idle the longest. If they don't answer, proceeds to the next agent who has been idle second longest, and so on until the call is answered.
- Weighted - Sends calls to agents based on percentages you assign to each agent in the call queue profile (up to 100%). Only applicable for priority-based routing.
- Simultaneous - Sends calls to all agents in a call queue at once. Only applicable for priority-based routing.
- Click Save.
Edit call queue overflow settings
The overflow settings determine how your overflow calls are handled when the call queue becomes full.
- From Control Hub, go to Services and select Customer Experience from the left navigation.
- Select Queues.
- Select the call queue to edit from the list.
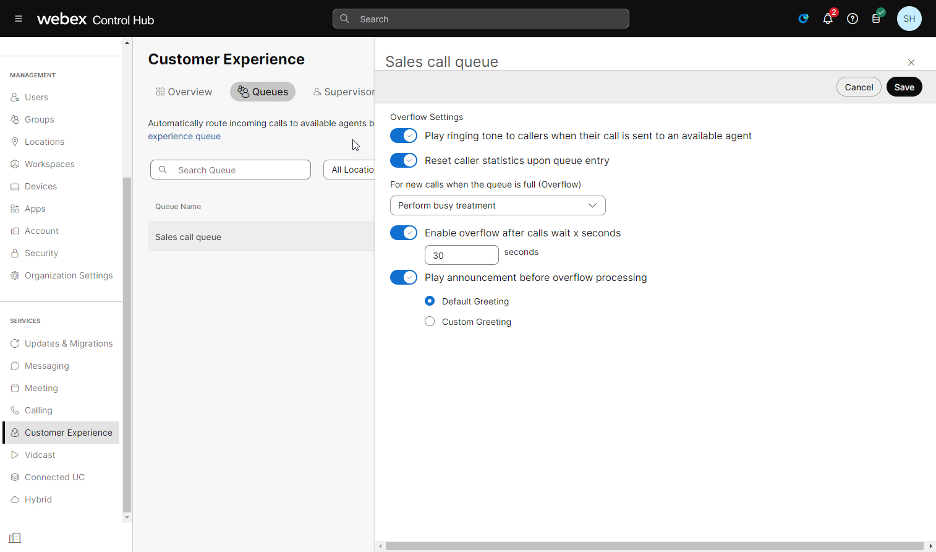
- In the side panel, click Overflow Settings.
- Toggle on or off the following settings, as needed:
- Play ringing tone to callers when their call is set to an available agent
- Reset caller statistics upon queue entry
- Choose how to handle new calls when the queue is full:
- Perform busy treatment - The caller hears a fast-busy tone.
- Transfer to phone number - Enter the number where you want to transfer overflow calls.
- Play ringing until caller hangs up - The caller hears ringing un
- Toggle on or off the following settings, as needed:
- Enable overflow after calls wait x seconds - With this option, you can enter a wait time (in seconds) for callers. Once this wait time is reached by the caller, the overflow treatment is triggered.
- Play announcement before overflow processing - If this option is disabled, callers will hear the hold music until the call is answered by a user.
- Click Save.
Edit call queue bounced call settings
Bounced calls are those that were sent to an available agent, but the agent does not answer. These calls are then placed back into the queue at the top of all the queued calls. You can edit how bounced calls are handled.
- From Control Hub, go to Services and select Customer Experience from the left navigation.
- Select Queues.
- Select the call queue to edit from the list.
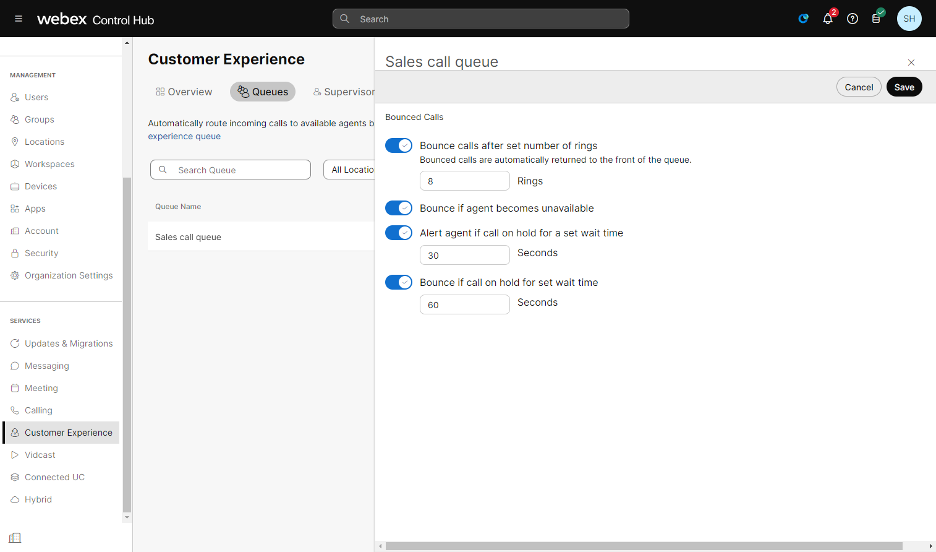
- In the side panel, click Bounced Calls.
- Select the toggle next to any of the following options to enable or disable the setting:
- Bounce calls after set number of rings - If this option is selected, then enter the number of rings.
- Bounce if agent becomes unavailable
- Alert agent if call on hold for a set wait time - If this option is selected, then enter the wait time in seconds.
- Bounce if call on hold for set wait time - If this option is selected, then enter the wait time in seconds.
- Click Save.
Change agent’s status to unavailable for bounced calls
With the bounced call policy, you can set an agent's status to Unavailable if a call presented to them is not answered and bounces. Here are some example scenarios where a call might bounce:
- No answer - The agent doesn’t answer the call within a specified number of rings based on the queue settings.
- Not reachable - The call is directed to the agent’s unregistered device.
- Call decline - The agent declines the call directed to them.
If a call to an agent bounces and the bounced call policy is enabled, the agent's status automatically changes to Unavailable. The call is then returned to the queue and offered to the next available agent, preventing it from being routed back to the same agent and reducing call waiting times for customers.
Supervisors can see this status change in the agents monitoring dashboard, where an information icon indicates that the status was set by the bounced call policy. This icon disappears once the agent sets their own status. The agent will also receive a notification in Webex App about the status change and must reset their status to Available to receive new calls from the queue.
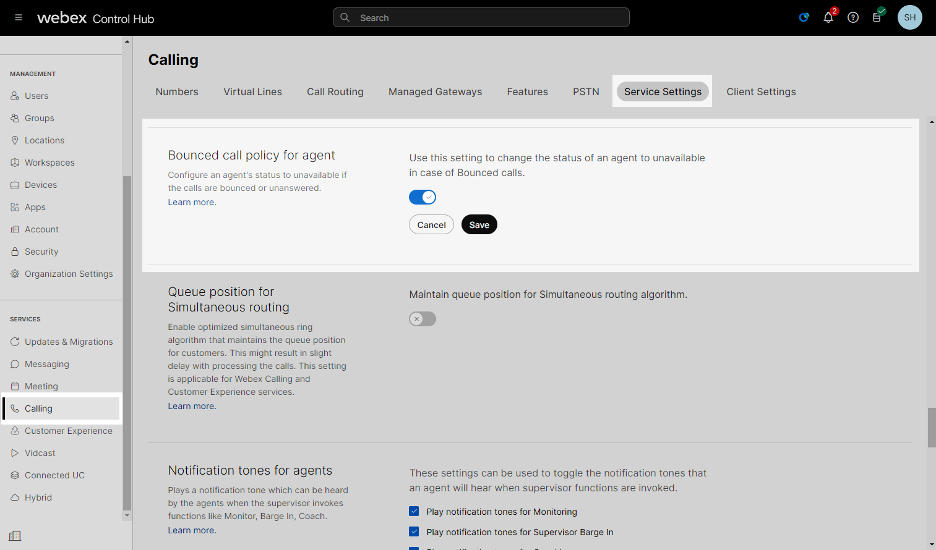
You can enable this feature at the organization level. Enabling this setting applies to all Customer Assist agents within the organization.
- From Control Hub, go to Services > Calling > Service Settings.
- Go to the Bounced call policy for agent section, and turn on the toggle.
- Click Save.
If you enable this bounced call policy, we recommend that you disable the Allow agents on active calls to take additional calls setting at the queue level. Otherwise, the agent’s status changes to Unavailable if they don’t have call waiting enabled or don't answer the new call.
If an agent calls a queue that they are assigned to, their status automatically changes to Unavailable.
Edit call queue call back settings
The call back option allows callers to receive a call-back to the phone number provided when their original position in the queue reaches. The phone number is verified against a location’s outgoing calls policy. You can configure the call back settings only if you've enabled the Estimated wait message for queued calls option.
- From Control Hub, go to Services and select Customer Experience from the left navigation.
- Select Queues.
- Select the call queue to edit from the list.
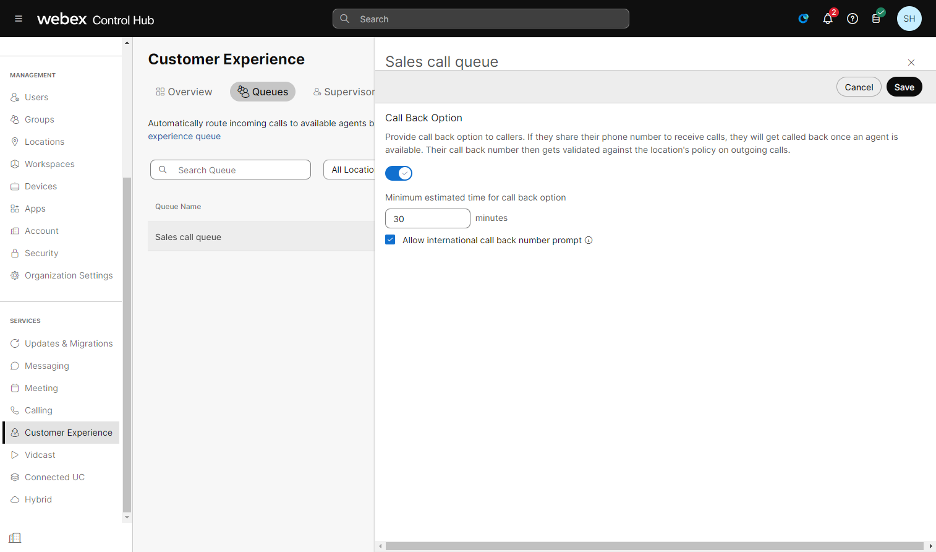
- In the side panel, click Call Back.
- Select the toggle to enable or disable.
- Enter Minimum estimated time for call back option in minutes. This determines at what estimated wait time the caller receives the call back prompt.
- Check the Allow international call-back number prompt check box. This allows international users wanting a call-back to enter their country code. The call-back numbers validate against a location's policy on outgoing calls.
- Click Save.
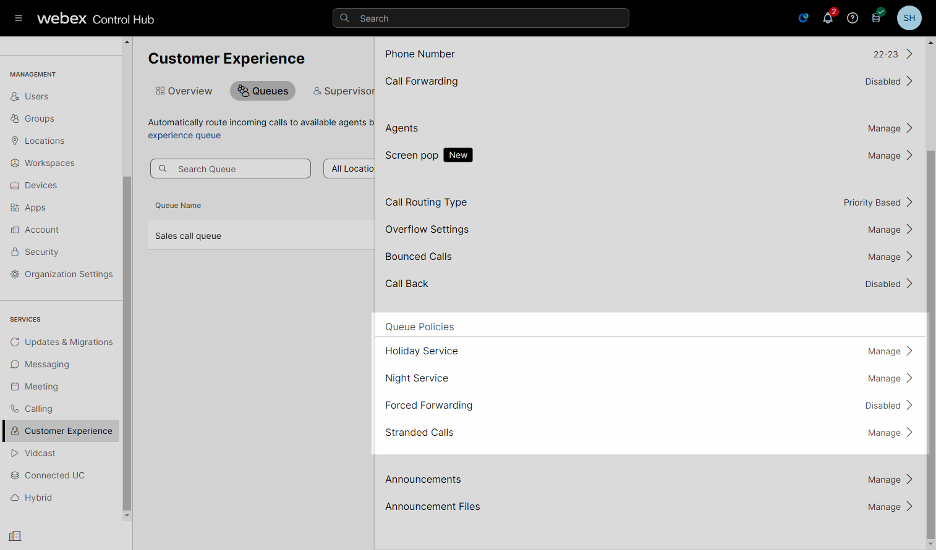
Manage call queue policies
Call queue policies are important to understand how calls get in and out of the queue. The services that are part of queue policies take precedence in this priority order:
- Holiday service
- Night service
- Forced forwarding
- Stranded calls
The services enabled in the call queue take the order of precedence and enter the call queue to determine the following:
- How the call is handled when the call queue becomes full
- If the call is bounced when the agent does not answer the calls
- How the call is processed when the queue has no agents
To edit the policies for a call queue, follow these steps:
- From Control Hub, go to Services and select Customer Experience from the left navigation.
- Select Queues.
- Select the call queue to edit from the list.
- Under Queue Policies, select the policy you’d like to modify:
- Holiday Service - Configure the call queue to route calls differently during the holidays.
- Night Service - Configure the call queue to route calls differently during the hours when the queue is not in service. This is determined by a schedule that defines the business hours of the queue.
- Forced Forwarding - Allows the queue to be put in an emergency mode to forward calls to a different location during the emergency. Configure the call queue to temporarily divert new incoming calls to a different route independent of the Night Service and Holiday Service route.
- Stranded Calls - A stranded call is processed by a queue that has no agents currently staffed. Configure the call queue routing policy for calls stranded in queue when all the agents are signed out, unjoined, or unavailable.
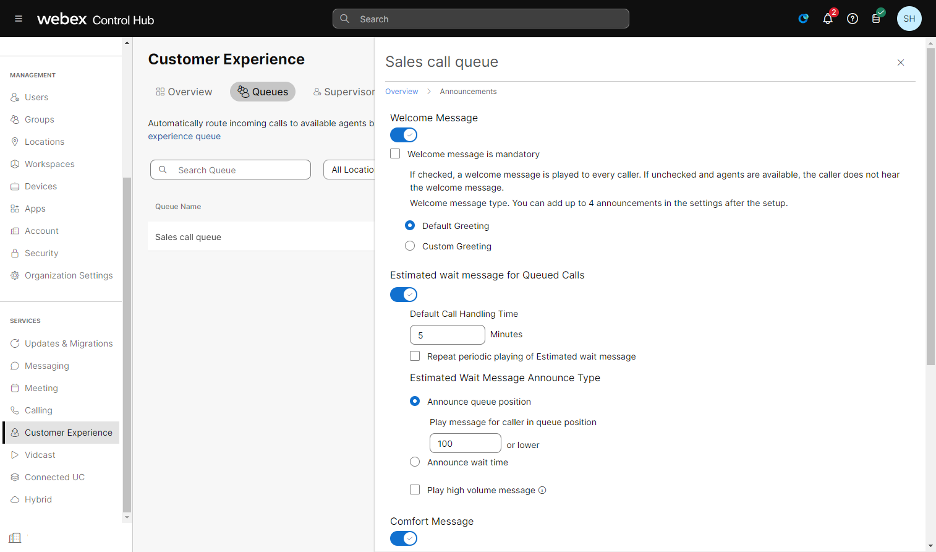
Edit call queue announcement settings
Call queue announcements are messages and music that callers hear while waiting in queue. You can manage your announcement settings for an existing call queue.
- From Control Hub, go to Services and select Customer Experience from the left navigation.
- Select Queues.
- Select the call queue to edit from the list.
- In the side panel, select Announcements.
- Click the toggle next to any of the following services to edit the announcement setting:
- Welcome Message - Play a message when callers first reach the queue. For example, “Thank you for calling. An agent will be with you shortly.” It can be set as mandatory. If the mandatory option is not selected and a caller reaches the call queue while there is an available agent, the caller will not hear this announcement and is transferred to an agent.
- Estimated wait message for Queued Calls -Notify the caller with either their estimated wait time or position in the queue. If this option is enabled, it plays after the welcome message and before the comfort message.
- Comfort Message - Play a message after the welcome message and before hold music. This is typically a custom announcement that plays information, such as current promotions or information about products and services.
- Comfort Message Bypass - Play a shorter comfort message instead of the usual Comfort or Music On Hold announcement to all the calls that should be answered quickly. This feature prevents a caller from hearing a short portion of the standard comfort message that abruptly ends when they are connected to an agent.
- Hold Music - Play music after the comfort message in a repetitive loop.
- Call Whisper Message - Play a message to the agent immediately before the incoming call is connected. The message typically announces the identity of the call queue from which the call is coming from.
- After you’ve made your modifications, click Save.
Announcement files
Call queue announcements are messages and music that callers hear while waiting in queue. To manage your announcement files for an existing call queue, follow these steps:
- From Control Hub, go to Services and select Customer Experience from the left navigation.
- Select Queues.
- Select the call queue to edit from the list.
- In the side panel, select Announcement Files.
- You can upload an announcement file or record your own announcement. Click Attach a file to upload an audio file from your local machine. Click Record to record your own announcements.
Manage call queue agents
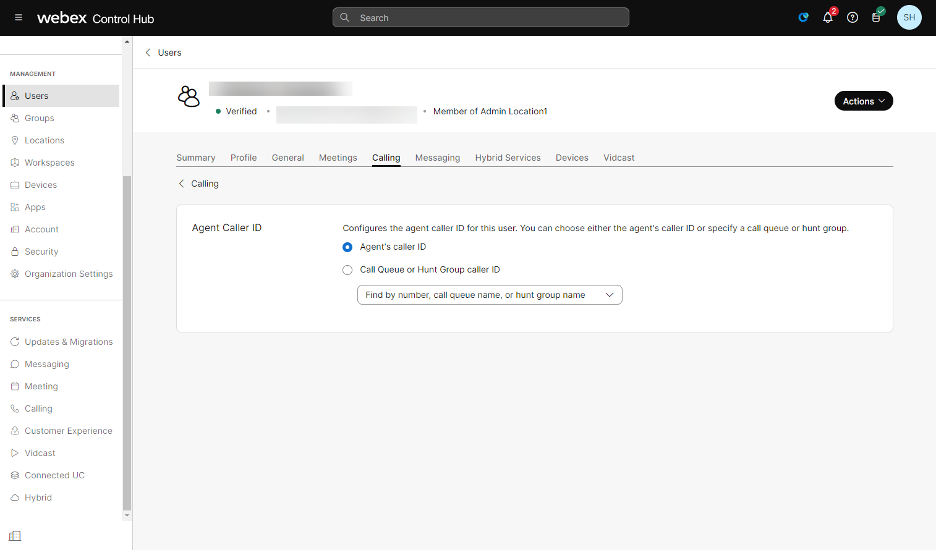
Configure agent caller ID settings for a user
For every Webex call, you'll get a business Calling Line ID (CLID). This CLID can be either a call queue number or the agent's phone number. The agent can choose to set this information permanently or temporarily for outgoing calls.
- From Control Hub, go to Management and select Users from the left navigation.
- Select the user you’d like to configure the agent settings for.
- Select Calling.
- Under Agent Settings, select Agent Caller ID. You can set the agent caller ID to either the agent's own caller ID or a specific queue/hunt group.
- Configure the agent call queue/hunt group ID from the following options:
- Configured Caller ID - The caller ID which is already configured to the agent.
- Call queue or hunt group caller ID - Search by number or queue name and select the Call queue or hunt group Caller ID from the drop-down list
When the agent you’ve selected isn’t part of the call queue or hunt group, by default, this option is disabled.
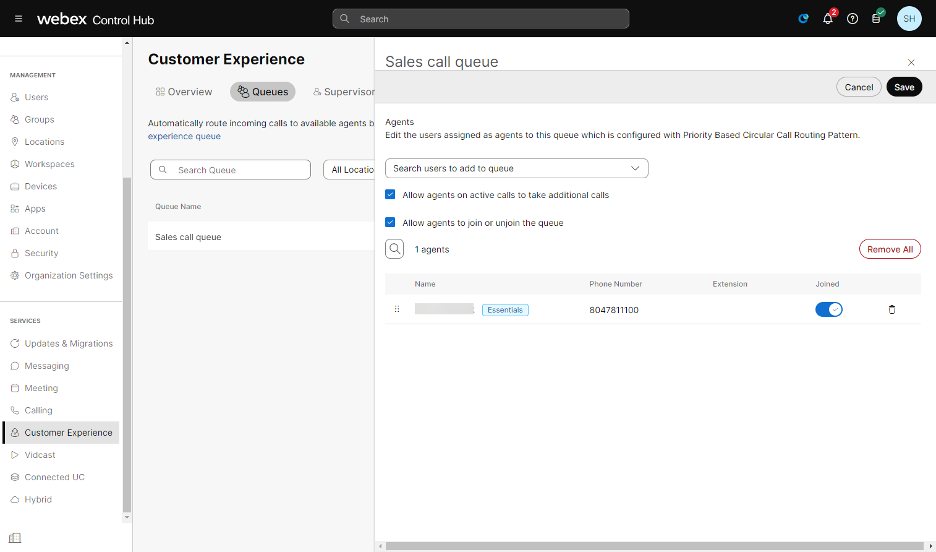
Add or delete agents
Users who receive calls from the queue are known as agents. You can add or delete users and workspaces from a call queue. Users and workspaces can be assigned to multiple call queues.
- From Control Hub, go to Services and select Customer Experience from the left navigation.
- Select Queues.
- Select the call queue to edit from the list.
- In the side panel, select Agents.
- If you’re using skill based call routing, you can select a default skill level value for agents from the Assigned Skill Level drop-down list.
Call routing is based on an agent's skill and competence level. The highest skill level is 1 while the lowest is 20.
- Use the search tool to add users or workspaces.
- Select the following settings, if applicable:
- Allow agents on active calls to take additional calls - Check this box to enable this feature for the agents assigned to this queue.
- Allow agents to join or unjoin the queue - Check this box to enable this feature for the agents assigned to this queue.
- Make the following edits in the agents table, if applicable:
- If using skill based call routing, edit the skill level for the agents assigned to this call queue.
- Use the toggle in the Joined column to join or unjoin agents to this call queue.
- To remove a user or workspace from this call queue, click the trash icon next to the user or workspace.
- Click Save.
All agents are added with joined state as TRUE during queue creation. Calls are not routed to the agent even though the agent is available when an agent's joined state is set to FALSE.
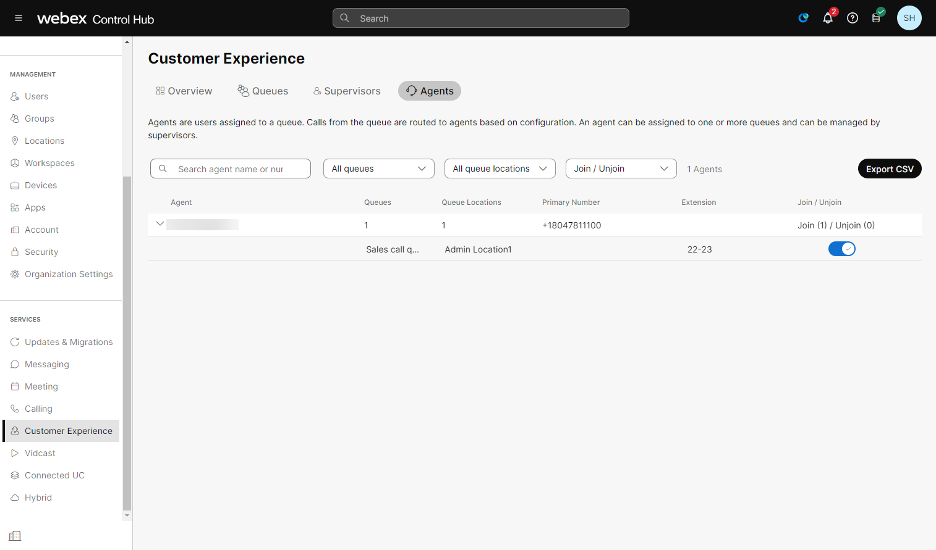
View agent dashboard
The agent dashboard gives administrators a unified view of all agents in call queues. It shows agent details and their call queue participation, helping administrators make staffing decisions and easily change an agent's join status.
- From Control Hub, go to Services and select Customer Experience from the left navigation.
- Select the Agents tab. Here you can do the following:
○ Filter the agent list based on call queues, queue locations, and join/unjoin status.
○ Select the arrow to expand on the agent details.
○ Toggle to Join or Unjoin an agent to the specific call queue.
○ Select Export CSV to export a spreadsheet with the comprehensive agent details.
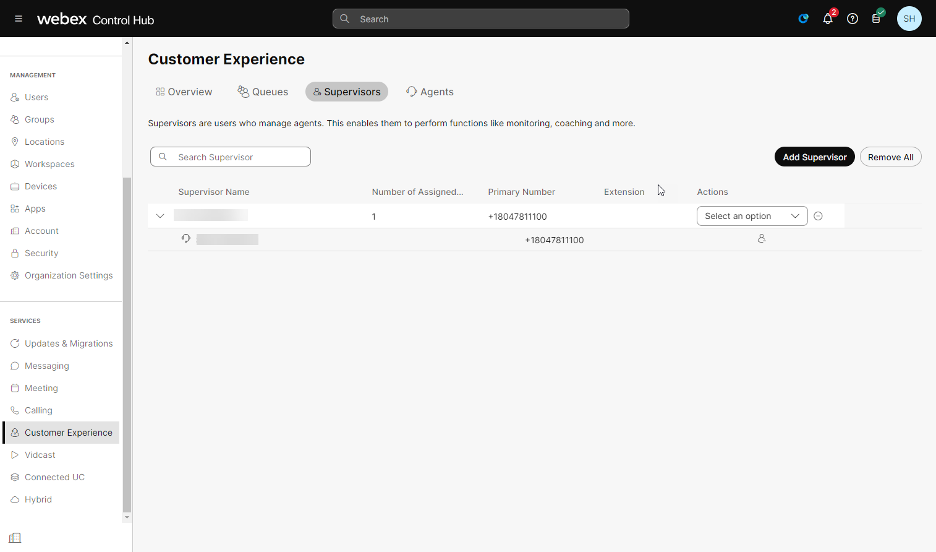
Manage call queue supervisors
Supervisors are users who manage call queue agents. Agents in a call queue can be associated with a supervisor who can silently monitor, coach, barge in or to take over calls that their assigned agents are currently handling.
To learn more about the supervisor functions available with your service, see this guide.
You can add or delete call queue supervisors in Control Hub. Once supervisors are added, you can then assign agents to the supervisor. To do so, follow these steps:
- From Control Hub, go to Services and select Customer Experience from the left navigation.
- Select the Supervisors tab. Here is a list of the supervisors, along with the agents assigned to them.
To view the agents assigned to each supervisor, click the expand arrow next to the supervisor name.
- To add a supervisor, click Add Supervisor. Once a supervisor is added, you can assign agents to the supervisor.
- To remove a supervisor, click the Remove supervisor icon associated with the supervisor.
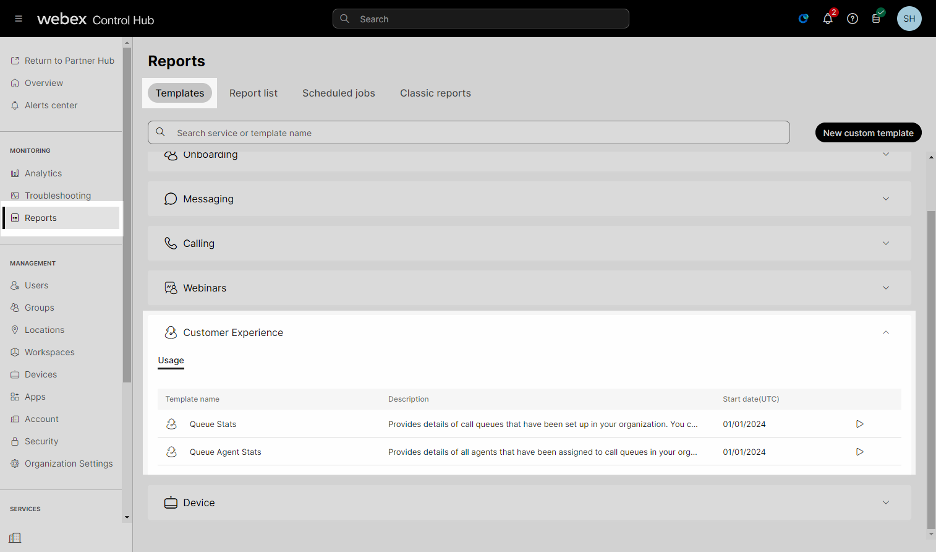
Generate and download call queue stats and agent stats reports
To see data for call queues and call queue agents in a CSV file format, you can download the Call Queue Stats and Call Queue Agent Stats reports from Control Hub.
- Call Queue Stats - This report shows details of call queues that have been set up in your organization. You can use this report to see the number of incoming calls to call queues and the status of those calls.
- Call Queue Agent Stats - This report shows details of all the agents that have been assigned to call queues in your organization. You can use this report to see which agent gets the most calls and information about their calling stats.
To generate a report, follow these steps:
- From Control Hub, go to Monitoring and choose Reports.
- Select Templates > Customer Experience.
- Click the report template (Queue Stats or Queue Agent Stats) you’d like to generate.
- Click Generate report.
- Choose when you’d like the report to run.
- Now - Select which date range you want to view the data for.
- Daily - Select which days you want to generate the report automatically. The report contains data for the previous day of what you select.
- Weekly - Select the day that you want to generate the report automatically every week. The report contains data for the last 7 days starting from the day that you select.
- Monthly - Select the day that you want to generate the report automatically every month. The report contains data for the last 30 days starting from the day that you select.
- Check the Notify me by email check box if you want an email of when the report is ready for you to download.
- Depending on the schedule for the report, select Generate Report or Schedule Report.
Once a report is generated or scheduled, it shows up in the Report list tab. You can only have a maximum of 50 reports in this list. Future scheduled reports won't run until there are fewer than 50 reports.
To download a report, follow these steps:
- From Control Hub, go to Monitoring and choose Reports.
- Select Report list.
- Under Actions, click the More icon next to the report you want to download, and then select Prepare for download. The report's status changes to Preparing for download.
- Once the report's status changes to Ready for download, click the More icon, and then select Download report.
- Select Compressed file or Regular size file. The report starts to download.
View call queue analytics
Use the Analytics page in Control Hub to see up to 13 months of historical data, including data on your call queues. For call queues, you can view call queue stats, call queue agent stats, and live queue stats.
- From Control Hub, go to Monitoring and choose Analytics.
- Select Customer Experience.
- Then select Queue stats, Queue agent stats, or Live queue stats.
Tips for using the analytics dashboard in Control Hub:
Adjust time period - You can view some charts in an hourly, daily, weekly, or monthly timescale so you can track engagement over time and look for usage trends. This offers powerful insight into how incoming calls are being handled in call queues. Note: The date picker doesn't apply to data in the live queue stats section. Data for the live queue stats section is collected every 30 seconds.
Global filters - The dashboard contains powerful filtering tools. Click on the Filters bar to select which data you want to see. The filters that you select will automatically apply to all of the charts. You can filter by specific call queues and locations.
Export data or charts - You can export any graph or detail view. Click the More button on the top right of the chart/list, and select the file format for your download (PDF, PNG, or CSV, depending on whether it's a graph or list). When you combine file download with the filters available, you can easily generate useful reports about call queues in your organization.
