
Get started for administrators (part 2)
Directory Service Integration via Webex Common Identity for Dedicated Instance
Synchronize users from cloud-based directories such as Azure AD to Dedicated Instance applications such as Unified Communications Manager and Cisco Unity Connection with the Cloud Directory Service. During synchronization, the system imports a list of users and associated user data from the Azure Active Directory (or a similar Cloud Directory service) that is synchronized into the Webex Identity Service. You need to select the Unified CM cluster from Control Hub that needs synchronization, select the appropriate Unified CM User ID field mapping, and then select the required synchronization agreement to perform synchronization.
Webex Application Integration with Dedicated Instance for In-App Calling
Integrating calling from Webex Application with the Dedicated Instance solution enhances the calling experience, enabling end users to make calls directly from the Webex Application through the Cisco Unified Communications Manager (Unified CM) and use mid-call features.
Integrating calling enables registration of the Webex Application directly to the Unified CM call control environment in Dedicated Instance.
When dialing from the Webex Application, users can use the same dial strings or prefixes as they do on their desk phones. The Webex Application functions like any other desk phone registered to Unified CM. Unified CM calls that are established in Webex Application use the configuration (location, bandwidth settings, point-to-point media, and so forth) that is in place for the Unified CM deployment.
In softphone mode, the Webex Application registers as a SIP device with the product type "Cisco Unified Client Services Framework" or CSF for desktop, TCT or BOT for mobile, and TAB for tablets. Alternatively, the Webex Application can connect to the Unified CM using CTI to control the user's endpoints.
Integration Methods
There are two methods of registering the Webex Application for calling in Unified CM, through direct peering and through Mobile and Remote Access (MRA).
Direct Peering - Integrate Webex Application with Unified CM over the direct peering established to Dedicated Instance and enable Cisco Unified CM for Calling (Webex for Messaging and Meetings).
MRA - Integrate Webex Application with Unified CM in Dedicated Instance and enable Cisco Unified CM for Calling (Webex for Messaging and Meetings), using MRA to register the Webex Application.
When registered over MRA, integration also can support the Interactive Connectivity Establishment (ICE) protocol. Cisco Unified CM uses Traversal Using Relay NAT (TURN) and Session Traversal Utilities for NAT (STUN) to optimize the media path of MRA calls.
Before you can integrate a Webex Application into the Dedicated Instance, perform these procedures.
- Sync users from the Active Directory (AD) to Control Hub and edit the licenses.
- Configure single sign-on (SSO) in Control Hub (Optional) so that users will authenticate through the enterprise identity provider.
- Install the latest Webex Application on the end-user’s Windows or Mac device(s).
- Ensure that the Windows or Mac end-user device has connectivity to the internet (direct or through Proxy) for user authentication of the Webex Application.
- To support secure registration and Secure Real-time Transport Protocol (SRTP) for the Webex Application, enable SIP OAuth across all applications, including Unified CM, Cisco Unity Connection, and Expressway.
Beginning with the 12.5 Webex Application release, Certificate Authority Proxy Function (CAPF) is no longer supported.
Configuration for Webex Application Integration
Configure Cisco Unified CM
This section identifies the unique configuration required for integrating the Webex Application with the Dedicated Instance solution.
- In Unified CM, navigate to User Management > End Users, and make sure the User’s email ID is configured. The User’s email ID configured in the Cisco Unified CM should be the same as the one configured in the Control Hub.
- Under the user's Service Settings, check the Home Cluster checkbox.
- Create the following device type in the Cisco Unified CM, based on from which device the User signs in to the Webex Application:
- Android Device (BOT)
- Chromebook/iPad Devices (TAB)
- Windows/macOS Devices (CSF)
- iPhone Device (TCT)
- Associate the User and the device created above.
- If CTI is needed for desk-phone control, assign the appropriate roles to the end user.
Configure Webex Control Hub
- Sign in to Webex Control Hub.
- Navigate to Organization Settings > UC Manager Profiles
In the UC Manager Profile, the domain configured in the “Voice Service Domain” should be the
Voice Service Domain provided by Cisco for that specific Dedicated Instance Region. - Configure the “Calling Behavior” to “Calling in Webex (Unified CM)” from:
- Organization Settings > Calling Behavior
- Users > Calling > Calling Behavior
- Choose the UC Manager Profile created in the Configure Cisco Unified CM section.
Dedicated Instance Auto-Provisioning of Webex App for Calling
The auto-provisioning feature in Control Hub enables the self-provisioning of the user's devices in Unified CM for Calling in Dedicated Instance without any administrator's intervention. This feature avoids over-provisioning multiple devices for a user in Unified CM and eliminates the need to approach the administrator whenever their personal device is changed. Devices are auto-created in Unified CM when a user is provisioned for Calling in Webex (Unified CM) and signs in with their registered email address or User ID to Webex App.
Administrators are not required to go to Unified CM to pre-provision any of the Webex App devices for users in their organization. When the user signs in to the Webex App using any device for the first time, the new device type is auto-created for the user even if the device is not already available in the Unified CM server.
This feature allows auto-provisioning of the following device types in Unified CM for the users when they sign into the Webex App from various device platforms:
- Android Device (BOT)
- Chromebook/iPad Devices (TAB)
- Windows/macOS Devices (CSF)
- iPhone Device (TCT)
Auto-Provisioning Settings
You can choose to auto-provision the device type for a user at the organization level and at the user calling settings level.
Note: Auto-provisioning of Webex App devices in the Unified CM is supported from Webex App version 41.12.
Organization Settings
- From Control Hub, go to Services > Calling > Client Settings.
- Define the policy to determine which devices are allowed for Auto-provisioning. Choose from an option:
- Desktop and mobile
- Desktop only
- Mobile-only
You can configure an auto-provisioning Webex app for users on desktop, mobile, or both. You can also change this setting at the user level for specific users in Control Hub.
The user level settings take priority over the organization’s default level settings for the auto-provisioning of the Webex app feature.
User Settings
Before you begin, ensure that the email ID or the user ID in the email format of Unified CM matches the user's email ID in Control Hub.
- From Control Hub, go to Management > Users.
- Select the user to modify and click Calling.
- Under Unified Communications Manager settings, select the allowed device option from the drop-down list. The default device type is Desktop and mobile.
- On the Unified CM Administration page, check if the user has a Primary Extension associated.
If the user does not have a Primary Extension and any device associated, add a Primary Extension to the user. - Go to User Management > User/Phone Add > Quick User/Phone Add.
- Find the user and add an extension in the Extensions settings.
Auto-Provisioned Device Settings
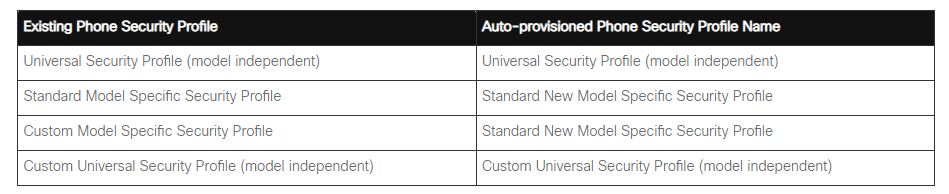
The following table lists the scenarios and the template settings used for the new device created when the user logs in to the Webex App for the first time from a new Mobile or Desktop device.

Based on the existing Phone Security Profile associated, the auto-provisioned device chooses one of the following new Phone Security profiles.
Call Presence Synchronization in Dedicated Instance
On a Call
With this feature, there is a synchronization of your desk phone (registered to Dedicated Instance Unified CM) On a Call status with the Webex App.
When you are on an active call on your Cisco phone, the presence status on the Webex App changes to On a Call.
Similarly, when the call disconnects, the status on the Webex App changes back to available.
Certain presence statuses have a higher priority compared to On a Call. These states are Do Not Disturb, Out of Office, Presenting, and In a Meeting. When your presence status is one of the above in your Webex App, on-hook or off-hook activity on the Cisco phone does not change your presence status to On a Call.
Do Not Disturb
Synchronize the Do Not Disturb Status between Webex app and Desk phone to get an Integrated experience for Webex calling Dedicated Instance users.
When you need time to focus and do not want incoming call notifications to disturb you, you don’t have to enable Do Not Disturb (DND) on each device separately. When you enable it on the Webex app, the state is automatically synchronized to your desk phone. Similarly, enabling it on your desk phone automatically synchronizes the state to your Webex app.
Note: When DND is enabled on your Webex app or Desk phone, you won’t get any notification of incoming calls and messages.
If any user doesn’t want the DND to be synchronized across all the devices, the admin can disable the DND synchronization in Control Hub by doing the following:
- Log in to Control Hub.
- Go to Service> Calling> Client Settings.
- In the Do Not Disturb (DND) Status Sync section, disable Allow DND to be synchronized.
Supported Versions and IP Phone Models
The presence synchronization feature is supported on:
- Unified CM version 12.5 SU7 and above.
- Webex App version 42.11 and above.
Supported phone models:
- Cisco IP Phone 8800 Series.
- Cisco IP Phone 7800 Series.
- Webex DX Series.
- Webex Desk Pro.
