
Configure features for the Cisco IP 8832 Series phones
This guide will cover the features and functions of the Cisco IP 8832 Series Phone.
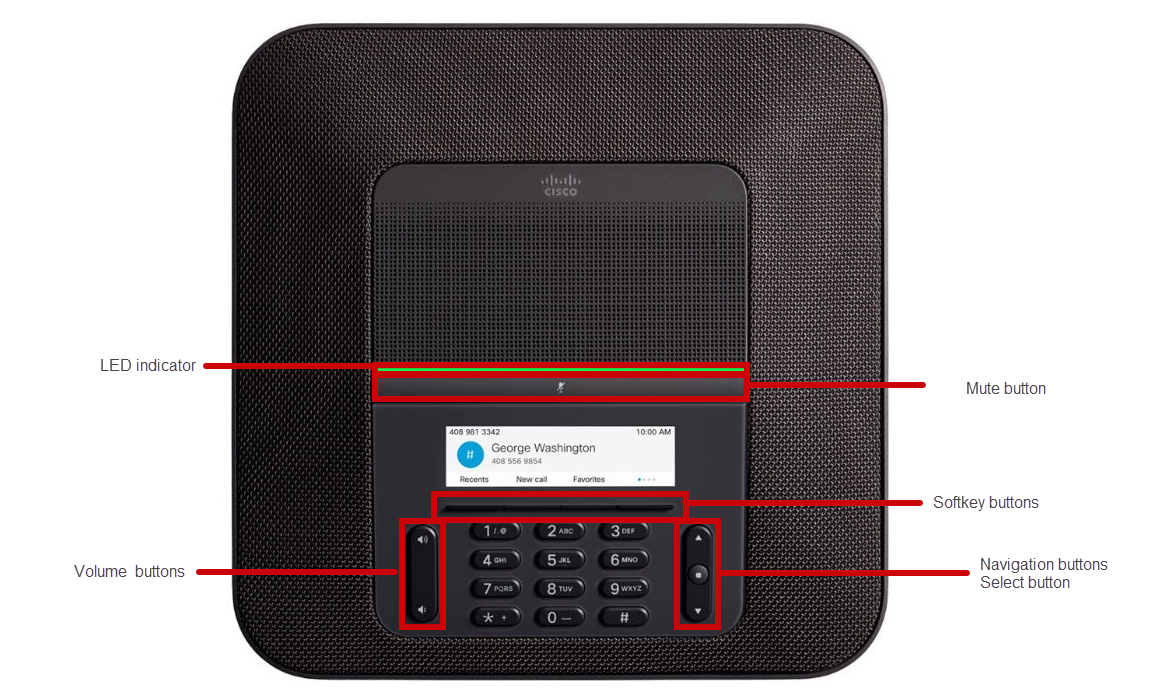
Function Buttons
These buttons are key to many of the feature processes of the Cisco IP 8832 series phones:
- Navigation Cluster - The navigation cluster is the circular buttons in the middle of your phone. Press up or down to scroll through the options, lists, and menus. Press the center button to select the highlighted item.
- Softkey Buttons - The softkey buttons, located beneath the main display, are used to perform various functions that appear directly above them. The softkey functions may change to support your current activity. For example, when you’re on a call, the softkey functions help you manage that call.
Make and receive calls
Placing calls
To place a call:
- Dial the number and press the Call softkey button.
Answering calls
To answer an incoming call:
- Press the Answer softkey button.
Rejecting calls
To decline an incoming call:
- Press the Decline softkey button.
- The incoming call will divert to voicemail or to your call forward no answer destination number immediately.
Answering a call while on an active call
To answer an incoming call while on an active call:
- Press the Answer softkey – your active call will automatically be placed on hold.
To decline the incoming call:
- Press the Decline softkey – the incoming call diverts to voicemail or your call forward no answer destination number.
Enable calling functions
Call hold
To place an active call on hold:
- Press the Hold softkey button.
Resume a call that was placed on hold
To retrieve a call that’s been placed on hold:
- Press the Resume softkey button.
N-Way calling
To initiate a three-way call, while on an active call:
- Press the Conf softkey button.
- Enter the desired extension or phone number.
- When the number called answers, press the Conf softkey again to connect the three-way call.
Ending an N-Way call
To end a three-way call:
- Press the End Call softkey.
Enable call forwarding
To enable Call Forwarding:
- Press the Forward All softkey.
- Enter the number you wish to forward to.
- Press the Dial softkey.
The display shows that the line is forwarded to that destination number. To disable call forwarding, press the forward off softkey.
Enable do not disturb
To enable Do Not Disturb:
- Press the Do Not Disturb (DND) softkey.
When Do Not Disturb is enabled, all incoming calls will be diverted to voicemail or to your call forward no answer destination number. To disable Do Not Disturb, press the Turn off DND softkey again.
Transfer a call
Blind/Cold transfer
To transfer a call to another person without talking to them privately about the caller beforehand.
While on an active call:
- Press the Transfer softkey.
- Enter the phone number and once it starts ringing press the Transfer softkey to complete the transfer.
Consulted/Warm transfer
To talk privately about a call before transferring:
- While on an active call, press the Transfer softkey.
- Enter the phone number. The first call will be automatically placed on hold and the destination party’s phone will ring.
- When the destination party answers, you can talk privately about the call before transferring.
- To complete the transfer, press the Transfer softkey again.
Park and retrieve calls
Call Park is a shared hold that allows you to “park” a call on one phone and retrieve it on another phone. For example, if you receive a call from a customer with a question about their archived file, you can park the call and retrieve the call from the file room phone to answer their account questions.
To park a call:
- Press the Park softkey and hang up.
- Communicate the parked number to the person who needs to answer the call.
To retrieve a parked call from any phone:
- Enter the number where the call is parked to retrieve the call. Press the Pickup softkey.
Access your call history
To access Call History for placed, answered, and missed calls:
- Press the Recents softkey button or press up on the navigation cluster.
- From here you can choose from: All calls, Missed Calls, Received Calls, and Placed Calls.
- Use the navigation arrows to scroll to your desired list and press the Select softkey to make your selection.
To place a call, scroll to the desired number and press the Call softkey.
Retrieve your voicemail
To access your voicemail system:
- Press the Messages softkey button.
- Then follow the voice prompts to choose a PIN, record your name, and record your personal greeting.
To retrieve your voicemail:
Press Messages and follow the voice prompts to enter your voicemail PIN.
Transfer your voicemail messages
Sometimes you receive voicemail messages that are meant for another co-worker or would like for a colleague to listen to information left in a voicemail message. In these instances, it is easiest to simply transfer the voicemail to his or her extension instead of transcribing the information and calling or emailing your co-worker.
To transfer your voicemail message:
- Call your Voice Portal, either by dialing your business phone number or by pressing the message button, if applicable.
- Proceed to enter your passcode, usually a 4-digit number followed by the pound (#) key. The prompt for the voicemail menu options will begin.
- Press 1 to listen to your current voice message.
- Press 9 for additional options.
- Press 2 to forward the current message. You will be asked to record an introduction prior to sending the message. Once finished, press the pound (#) key. Note: This step is required, and you will not be able to proceed until you record an introduction.
- Press 3 to forward to 1 or more destinations.
- You will then be prompted to enter the extension/mailbox ID of the new recipient followed by the pound (#) key.
- Your voice message will now be sent to the extension/mailbox ID previously entered.
- Once finished, you can end the call or listen to additional voicemail menu options.
Setting up your extended away greeting
- Call your Voice Portal, either by dialing your business phone number or by pressing the message button, if applicable.
- Proceed to enter your passcode, usually a 4-digit number followed by the pound (#) key. The prompt for the voicemail menu options will begin.
- Press 4 to access the Extended Away Greeting menu.
- Press 3 to record your Extended Away Greeting. You will be prompted to record your message following the tone. Once finished, press on the pound key (#).
- To activate your Extended Away Greeting, press 1.
Note: To deactivate the Extended Away Greeting, follow the steps 1 through 3. When prompted, press 2 to deactivate the Extended Away Greeting. - Your Extended Away Greeting has now been activated.
